Stromberg Carlson CC‑255 Tray

Why I Chose the Stromberg Carlson CC‑255 Tray for My Tongue-Mounted Condenser

Every now and then in this build, I hit a moment where a single decision suddenly unlocks a cleaner, smarter, more intentional layout.
Today was one of those moments — and it came in the form of a steel cargo tray designed for generators.
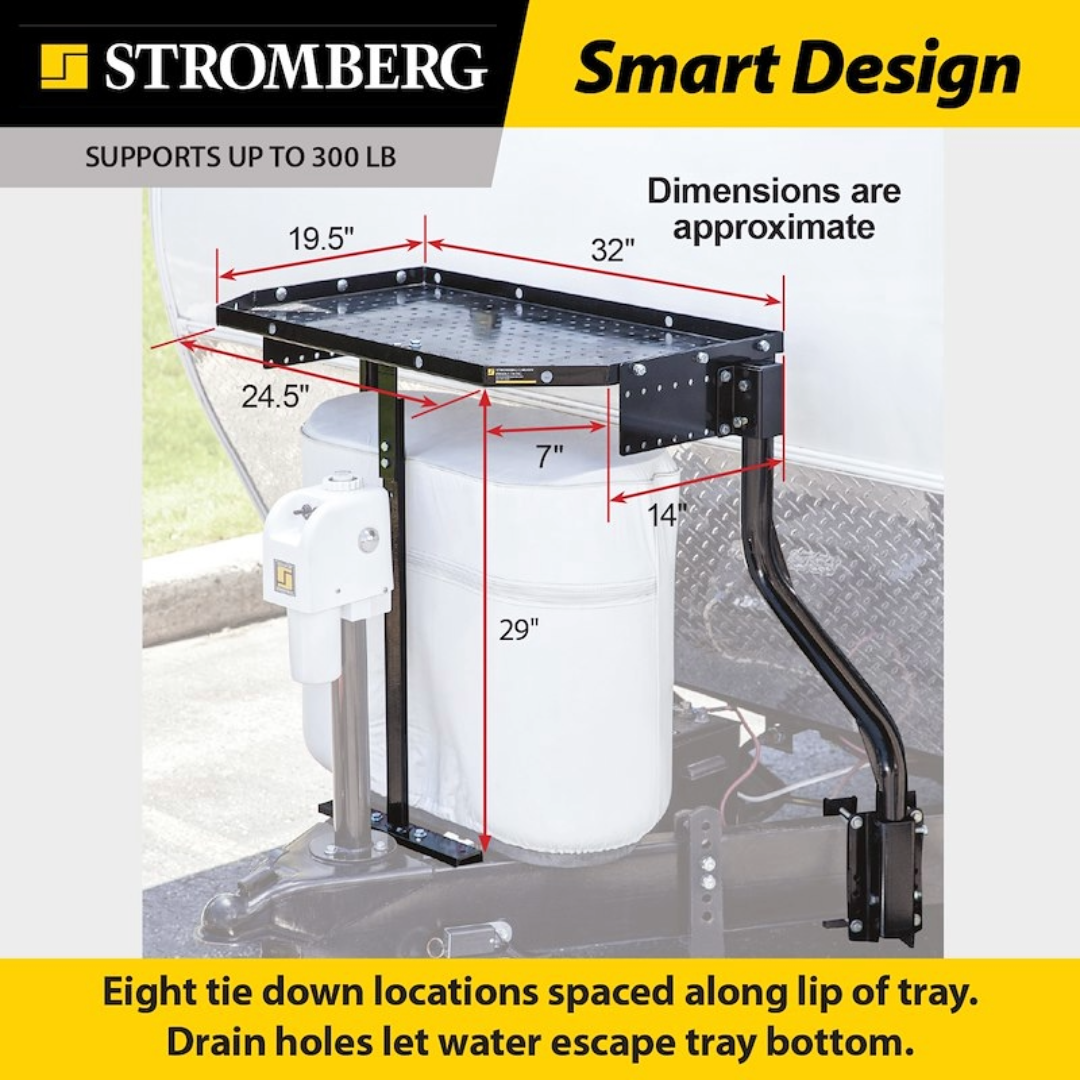
Specifically, the Stromberg Carlson CC‑255 Trailer Tray.

This tray is now the foundation for mounting my HVAC condenser on the tongue, above the propane tanks.
And honestly, it feels like one of the most strategic upgrades I’ve made so far.


The Problem I Needed to Solve

Originally, the HVAC condenser was going to live in the garage.
It made sense on paper — plenty of space, easy access, and a straight shot to the air handler.
But the more I thought about it, the more it bothered me:

  • It would dump heat into the garage.
  • It would compete for space with the hot water system.
  • It would complicate airflow and ventilation.
  • It just didn’t feel like the right long-term solution.

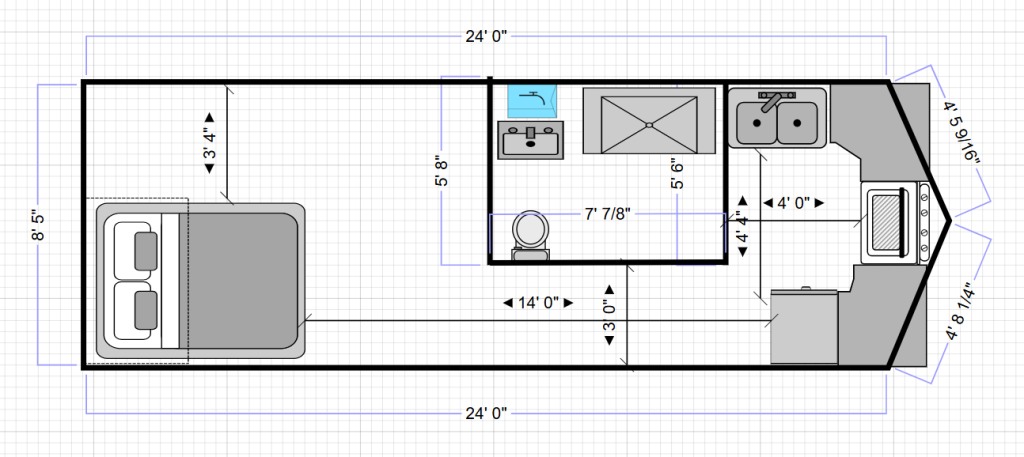
I wanted the garage to be a clean mechanical bay — hot water, manifolds, electrical routing — not a heat chamber.
So I started looking at exterior mounting options.


The A‑Frame Tongue: An Untapped Opportunity

The tongue already houses the dual propane tanks, and it’s one of the most structurally solid parts of the trailer.
It’s also exposed to open air, which is exactly what a condenser needs.

The challenge was finding a way to mount the condenser above the propane tanks without interfering with:

  • tank access
  • regulators
  • propane lines
  • clearances
  • weight distribution

That’s when I found the Stromberg Carlson CC‑255.


The Moment It Clicked

I came across a video of someone using the CC‑255 tray to mount a generator above their propane tanks.
And immediately I thought:

“That’s it. That’s exactly how I can mount the condenser.”

The tray clamps directly to the A‑frame, sits above the tanks, and provides a stable, adjustable-height platform.
It’s built for outdoor equipment, it’s rated for the weight, and it solves every clearance issue in one move.


Why the CC‑255 Is Perfect for This Build

  • It clears the propane tanks. The adjustable height and angled supports make it easy to position above the tank cover.
  • It supports up to 300 lbs. More than enough for a condenser plus vibration pads.
  • It’s designed for A‑frame trailers. No custom fabrication required.
  • It improves airflow. The condenser gets open air on all sides.
  • It frees up the garage. No more heat load or equipment crowding.
  • It keeps service access simple. Everything is reachable from the front of the trailer.

This tray wasn’t designed for HVAC equipment, but it might as well have been.
It solves a real problem with a clean, off‑the‑shelf solution.


How It Changes the Build

Relocating the condenser to the tongue has a ripple effect across the entire build:

  • The garage becomes a dedicated hot water and electrical bay.
  • Airflow and efficiency improve for the HVAC system.
  • Propane routing stays clean and unobstructed.
  • The mechanical layout becomes more intentional and future‑proof.

It’s one of those decisions that makes everything else better.


Final Thoughts

The Stromberg Carlson CC‑255 Trailer Tray wasn’t originally on my radar, but it ended up being exactly what I needed.
It’s strong, adjustable, purpose-built for the A‑frame, and it turns the tongue into a high‑function mechanical platform.

Sometimes the best solutions come from looking at a problem sideways — or in this case, from above the propane tanks.

I’m excited to get this tray installed and start mocking up the condenser placement.
This is one of those upgrades that feels like a turning point in the build.

Rethinking the Nature’s Head: My Composting Toilet Deep Dive

Rethinking the Nature’s Head: My Composting Toilet Deep Dive

When I first started planning this build, the toilet decision felt “done.” I picked the Nature’s Head, dropped it into the plans, and moved on.
It’s a proven, popular composting toilet with a solid track record, and it slotted neatly into the bathroom layout without much debate.

But as this project has evolved, so has my thinking. Today was one of those days where I went down a deep rabbit hole on composting toilets—especially the DIY side—and came back up seriously questioning whether a $1,000+ commercial unit still makes sense for this build.


What a Composting Toilet Really Is

The more I read, the more I realized how simple the core system really is. Strip away the marketing and molded housings, and a composting toilet is basically:

  • A solids container for the composting material and waste
  • A liquids diverter to keep urine separate
  • A small ventilation system to move air and control odor

That’s the heart of it. Everything else is enclosure, ergonomics, and branding.

Nature’s Head does all of that in a clean, integrated package—and it does it well. But once you understand the underlying components, it’s hard not to look at that four-figure price tag and start doing the math.


I’m Not Above Building My Own

One thing about this build: I’m not afraid to get hands-on. I’m already designing and installing plumbing, electrical, propane, and HVAC systems.
So when I look at a composting toilet and realize it’s mostly smart carpentry plus a few key parts, the thought naturally pops up:

“I can build something just as functional for a fraction of the cost.”

And at this point, I really believe that.

The Nature’s Head is still a great product. It’s well-engineered, well-documented, and widely used. But $1,000+ (once you factor in tax and shipping) is a big chunk of budget for something I might be able to replicate for a couple hundred dollars and a weekend of focused work.


DIY Composting Toilet Kits Are Everywhere

Once you start looking, you realize there’s an entire ecosystem around DIY composting toilets:

  • Urine diverters you can buy as standalone components
  • 12V vent fans designed specifically for composting setups
  • Complete “guts only” kits that let you build your own enclosure

That last one is especially interesting: I can build a custom enclosure that fits my space, my height, my storage needs, and my aesthetic—without paying for a pre-molded shell that was designed for a generic use case.

In other words, I can design the toilet to fit the trailer, not force the trailer to fit the toilet.


Ventilation: The Real Key (And the Easy Part)

The more I read, the more one theme kept coming up: ventilation is what makes or breaks a composting toilet.

If you have:

  • A sealed solids chamber
  • A properly sized vent line
  • A small, reliable 12V fan pulling air out

…then odor control becomes very manageable. And those are all things I’m already dealing with in other parts of the build—fans, vents, penetrations, and airflow.

So from a systems perspective, a DIY composting toilet doesn’t feel like a stretch. It feels like one more small subsystem that plugs into the larger ventilation and electrical picture.


Where I’m At Right Now

On paper, the Nature’s Head is still the “official” toilet in my plans. It’s in the diagrams, it’s in the layouts, and it’s in the documentation.
But mentally, I’m in a different place now.

I’m keeping my options open. I’m not locked into a commercial unit just because I wrote it down early in the process.
As the build progresses and I get deeper into the details, the idea of a custom composting toilet—built around my space, my needs, and my budget—is becoming more realistic and more appealing.


The Takeaway for Today

Today wasn’t about buying anything or installing anything. It was about stepping back and asking a simple question:

“Does this expensive, off-the-shelf solution still make sense now that I understand how it works?”

Right now, my honest answer is: maybe not.

I’m not making a final call yet, but I’m also not blindly paying $1,000+ for something I can likely build myself for a fraction of that cost.
This build has always been about intentional choices, and the toilet is officially back on the “intentional choice” list.

For now, I’m going to keep researching DIY composting designs, sketching ideas, and watching how the rest of the systems come together.
When it’s time to commit, I want that decision to feel as solid as the rest of the trailer—not just “good enough,” but truly aligned with how I’m building this thing: thoughtfully, creatively, and on purpose.

Hot Water System Options

Hot Water System Options

The hot water system supplies the bathroom and kitchen with heated water for daily use.
This page outlines the available heater types, their advantages, installation considerations, and how each option integrates with the overall plumbing layout.
The garage is the leading candidate for installation due to its ventilation, service access, and proximity to the bathroom.


1. System Requirements

The hot water system must supply heated water to the following fixtures:

  • Bathroom sink
  • Shower
  • Washer/Dryer Combo (if supported)
  • Kitchen sink

PEX hot water lines will run from the heater location (likely the garage) upward into the bathroom and forward to the kitchen.


2. Tankless Propane Water Heater

A tankless propane heater is one of the most common solutions for RV and trailer builds.
It provides unlimited hot water as long as propane and water flow are available.

Pros

  • Unlimited hot water
  • Fast recovery time
  • Compact footprint
  • Low electrical draw (mostly for ignition and controls)
  • Ideal for garage installation with proper venting

Cons

  • Requires propane supply and regulator
  • Needs exterior venting
  • Minimum flow rate required to activate burner

Best For

Full‑time or frequent use, long showers, and multi‑fixture hot water demand.


3. Electric Tankless Water Heater

Electric tankless heaters provide on‑demand hot water without propane, but they require significant electrical capacity.

Pros

  • No propane required
  • Compact and simple installation
  • No combustion gases or venting

Cons

  • Very high electrical demand (often 40–60 amps)
  • Not ideal for off‑grid or limited‑power setups
  • May require electrical upgrades

Best For

Shore‑power use or locations with strong electrical service.


4. Small Electric Tank Water Heater (4–6 Gallons)

A compact electric tank heater stores a small amount of hot water and reheats as needed.
This is a simple and reliable option for moderate hot water use.

Pros

  • Low electrical draw compared to tankless
  • Stable water temperature
  • Easy installation
  • No propane or venting required

Cons

  • Limited hot water capacity
  • Recovery time required between uses
  • Not ideal for long showers

Best For

Light to moderate hot water use, shore‑power environments, and simple installations.


5. Marine/Hybrid 12V + 120V Water Heater

Marine water heaters can run on 120V AC or engine coolant loops.
In a trailer build, only the electric mode is used, but they offer excellent insulation and recovery.

Pros

  • Highly insulated and efficient
  • Dual‑power capability (12V assist on some models)
  • Reliable and long‑lasting

Cons

  • More expensive than RV heaters
  • Larger footprint
  • Not tankless — limited capacity

Best For

Users who want a premium, efficient, long‑life hot water solution.


6. Recommended Installation Location: Garage

The garage is the preferred location for the hot water heater due to:

  • Ventilation (especially for propane tankless)
  • Service access from both inside and outside
  • Proximity to bathroom fixtures
  • Space for mounting and routing PEX lines
  • Ability to isolate heat and noise from living areas

PEX lines will run upward into the bathroom and forward to the kitchen, creating a clean and centralized plumbing layout.


7. Hot Water Routing Plan

Regardless of heater type, the hot water distribution will follow this path:

  • Heater (garage)
  • Bathroom sink
  • Shower
  • Washer/Dryer Combo
  • Kitchen sink

This routing minimizes pipe length and ensures fast hot water delivery to the bathroom, which is the highest‑use zone.


8. System Summary

The hot water system is a critical part of the trailer’s plumbing design.
Tankless propane heaters offer unlimited hot water and are ideal for garage installation,
while electric tank or hybrid heaters provide simpler, low‑maintenance alternatives.
All options integrate cleanly with the bathroom‑centered plumbing layout and supply both the bathroom and kitchen.

As the build progresses, this page will be updated with the final heater selection, mounting details, and installation notes.

Refrigerator

RecPro 10 Cu Ft 12V RV Refrigerator

Brand: RecPro
Model: 10 Cu Ft 12V Refrigerator
Type: Frost‑Free RV Refrigerator with Freezer
Finish: Black / Stainless Steel
Product Link:

View on RecPro

RecPro 10 Cu Ft 12V RV Refrigerator

Product Dimensions

Overall Size (W × D × H): 23.5″ × 26″ × 59″
Interior Capacity: 10 cubic feet

Weight

Unit Weight: 112.4 lbs

Key Features

  • 12V DC power — ideal for off‑grid and dry camping
  • Full refrigerator with separate freezer compartment
  • Double‑door design with built‑in lock
  • Adjustable interior shelves
  • Reversible door option
  • Frost‑free operation

Wanted to share this good post I found about refrigerators https://www.thervgeeks.com/12v-rv-refrigerator/

Stove

CAMPLUX Classic 21″ RV Propane Range & Oven

Brand: CAMPLUX
Model: RGS21MSF
Type: 3‑Burner Propane Range with Oven
Finish: Stainless Steel
Product Link:

View on Amazon


Product Dimensions

Overall Size (W × D × H): 21.3″ × 21.54″ × 16.06″
Oven Capacity: 1.8 cubic feet
Installation Type: Slide‑In Range

Weight

Unit Weight: 63 lbs

Performance

  • Total Output: 28,100 BTU/hr
  • 3‑Burner Cooktop (sealed burners)
  • Oven Light: 10W LED
  • 12V ignition (low draw)

Key Features

  • Anti‑vibration design for RV and trailer use
  • Flame failure protection
  • Improved heat distribution
  • LED‑lit control knobs
  • Stainless steel construction
  • Includes mounting screws, wire connectors, and user manual

HVAC

Blueridge Ductless Mini‑Split AC System

Model: BMM1822‑6W‑6W
Brand: Blueridge
System Type: Two‑Zone Ductless Mini‑Split
Product Link:

View Specifications

Blueridge Ductless Mini-Split AC System

Product Dimensions

Indoor Air Handler (W × H × D): 28.70″ × 11.50″ × 7.87″
Outdoor Condenser (W × H × D): 35.04″ × 26.50″ × 13.46″
Footprint Mounting Holes (W × D): 26.1″ × 13.9″

Weights

Outdoor Condenser Weight: 100.31 lbs
Indoor Air Handler Weight: 17.64 lbs (each)

Shower

DreamLine 36″ × 36″ Shower Base & QWALL‑5 Backwall Kit

Model: DL‑6194C‑01
Brand: DreamLine
Color: White
Material: Acrylic / ABS
Kit Includes: 36″ × 36″ Single‑Threshold Shower Base + QWALL‑5 Backwall Panels
Product Link:

View on Amazon

DreamLine 36x36 Shower Base and QWALL-5 Backwall Kit

Product Dimensions

Overall Kit Size (D × W × H): 36″ × 36″ × 76.75″
Shower Base: 36″ × 36″ (Center Drain)
Backwall Panels: Trim‑to‑fit design

Weights

Total Weight: 79.4 lbs

Key Features

  • SlipGrip textured floor surface for improved safety
  • High‑gloss, non‑porous acrylic for easy cleaning
  • Backwall panels made from Acrylic/ABS
  • Backwalls install over a solid surface (not directly to studs)
  • Base installs directly to studs; cUPC certified
  • Trim‑to‑size sidewall design for flexible installation
  • Lifetime Limited Warranty (base), 1‑year Limited Warranty (backwalls)

Washer and Dryer Combo

https://www.amazon.com/COMFEE-Washing-Machine-Overnight-Full-Automatic/dp/B09QFYYG56/


COMFEE’ 24″ Washer and Dryer Combo 2.7 cu.ft 26lbs Washing Machine Steam Care, Overnight Dry, No Shaking Front Load Full-Automatic Machine, Dorm White


Technical Details

Item Weight ‎161 Pounds
Annual Energy Consumption ‎90 Kilowatt Hours Per Year
Included Components ‎water inlet hose
Controller Type ‎Fully Automatic
Number of Drying Cycles ‎1
Number of Washing Cycles ‎5
Washer Dispenser Options ‎Single-compartment (Fabric Softener only)
Laundry Appliance Drum Material ‎steel
Operation Mode ‎Automatic
UPC ‎810040948954
Manufacturer ‎Comfee American Company
Part Number ‎CLC27N3AWW
Item Weight ‎161 pounds
Product Dimensions ‎25.2 x 23.4 x 33.5 inches
Item model number ‎CLC27N3AWW
Style ‎Washing Machine
Material ‎Plastic, Steel
Power Source ‎Electric
Installation Method ‎Free Standing
Item Package Quantity ‎1
Sound Level ‎63 Decibels
Handle/Lever Placement ‎Right
Display Style ‎LED
Special Features ‎Softener Dispenser
Batteries Required? ‎No
Warranty Description ‎One Limited Year Warrenty from original purchase date

Importing Categories in WordPress: A Simple and Effective Solution

I got this idea from: Importing Categories in WordPress: A Simple and Effective Solution – Noman Shah – AI Visionary | Inventor | Author | Entrepreneur

I built upon his solution to fit my website.

Introduction:

Organizing content efficiently is crucial for any blog or website. Categories play a significant role in this by helping readers navigate through different topics. However, importing a large number of categories into WordPress can be challenging. I recently faced this issue and tried several out-of-the-box solutions. Here’s how I overcame the problem with a simple tweak that made my life easier.

The Problem:

I needed to import a large number of categories into my WordPress site. Doing this manually was not an option due to the sheer volume. Naturally, I turned to plugins that promised to handle CSV imports effortlessly. However, I quickly encountered several roadblocks:

  • Some plugins failed to upload the CSV files correctly.
  • Others required paid versions to access CSV import features.

Possible Out-of-the-Box Solutions:

  1. WP All Import: Initially, I tried WP All Import, a popular plugin that handles various import tasks. Unfortunately, the free version doesn’t support taxonomy imports, which includes categories.
  2. WP Ultimate CSV Importer: Next, I looked into WP Ultimate CSV Importer. While it’s a robust tool, the CSV import feature for taxonomies is locked behind a paywall.

These limitations prompted me to think outside the box. I needed a solution that didn’t rely on paid plugins or cumbersome workarounds.

The Solution:

After some research and a bit of experimentation, I devised a simple yet effective solution. The idea was to convert my categories CSV into a PHP script, add it to my theme’s functions.php file, and execute it by opening a page. Here’s how I did it:add it to my theme’s functions.php file, and execute it by opening a page. Here’s how I did it:

  1. Convert CSV to Script: First, I prepared a list of categories and subcategories in an array format. Here’s an example with three main categories and three subcategories in each:
function create_blog_categories() {
    $categories = [
        ['name' => 'Technology', 'slug' => 'technology', 'description' => 'All about technology', 'parent' => ''],
        ['name' => 'AI and Machine Learning', 'slug' => 'ai-machine-learning', 'description' => 'Advancements in AI and ML', 'parent' => 'Technology'],
        ['name' => 'Blockchain', 'slug' => 'blockchain', 'description' => 'Blockchain technology and its applications', 'parent' => 'Technology'],
        ['name' => 'Health', 'slug' => 'health', 'description' => 'Health and wellness tips', 'parent' => ''],
        ['name' => 'Mental Health', 'slug' => 'mental-health', 'description' => 'Mental health awareness and tips', 'parent' => 'Health'],
        ['name' => 'Physical Health', 'slug' => 'physical-health', 'description' => 'Physical health and fitness', 'parent' => 'Health'],
        ['name' => 'Travel', 'slug' => 'travel', 'description' => 'Travel tips and destination guides', 'parent' => ''],
        ['name' => 'Travel Tips', 'slug' => 'travel-tips', 'description' => 'Tips for a better travel experience', 'parent' => 'Travel'],
        ['name' => 'Destination Guides', 'slug' => 'destination-guides', 'description' => 'Guides to various travel destinations', 'parent' => 'Travel']
    ];

    foreach ($categories as $category) {
        $parent_id = 0;
        if (!empty($category['parent'])) {
            $parent = get_term_by('name', $category['parent'], 'category');
            $parent_id = $parent ? $parent->term_id : 0;
        }

        if (!term_exists($category['slug'], 'category')) {
            wp_insert_term(
                $category['name'],
                'category',
                [
                    'description' => $category['description'],
                    'slug' => $category['slug'],
                    'parent' => $parent_id
                ]
            );
        }
    }
}
// Uncomment the line below to run the function once
// create_blog_categories();
  1. Add the Script to functions.php: I added this script to my theme’s functions.php file. Here’s how you can do it:
    • Go to Appearance > Theme Editor.
    • Open functions.php.
    • Paste the script at the end of the file.
    • Uncomment the line // create_blog_categories(); to run the function.
  2. Run the Script: To execute the script, I simply loaded any page of my WordPress site. This created the categories and subcategories as specified in the array.
  3. Comment Out the Script: After the categories were created, I commented out the line create_blog_categories(); to prevent the function from running on every page load.

Takeaway:

By converting the CSV data into a script and running it through functions.php, I was able to import categories into WordPress without relying on paid plugins. This simple tweak saved me a lot of time and effort, and it can do the same for you. If you’re facing similar issues, give this method a try and see how easy it can be to manage your WordPress categories.

Feel free to adjust the categories and subcategories as per your needs, and happy blogging!

Posted in Guides and TutorialsHow-To Guides