TNutz – Reference Supplier for Extruded Aluminum
TNutz is one of the primary suppliers for profiles, hardware, and accessories.
This page is a reference point for their products, and pricing style.

Your “warehouse” of links, notes, comparisons.
TNutz is one of the primary suppliers for profiles, hardware, and accessories.
This page is a reference point for their products, and pricing style.
As part of planning the fresh water system for this cargo trailer conversion, I wanted a simple way to
monitor how much water is going into the tanks during fills.
A small inline flow meter on the hose is an easy, low‑tech way to track gallons used and avoid overfilling.
One product I’m considering for this purpose is:
Save a Drop P3 Blue Water Flow Meter – Measure Gallon Usage from an Outdoor Garden Hose
The Save a Drop P3 is a compact, inline water flow meter that attaches to a standard garden hose.
It measures the total volume of water passing through and displays usage in gallons, making it useful for
filling RV or trailer fresh water tanks, portable containers, or even just tracking water consumption.
When filling fresh water tanks, it’s easy to lose track of how much water has gone in—especially when filling from
portable containers or non‑metered sources.
A small flow meter like this provides:
In practice, this meter would be attached inline on the hose used to fill the fresh water tank(s).
Before starting a fill, the meter can be reset to zero, and the display will show the total gallons added during that session.
This page serves as a reference for a simple, portable tool that can make tank filling more controlled and predictable,
especially when working with multiple tanks or off‑grid water sources.
While researching stabilization, leveling, and exterior accessory options for the cargo trailer conversion, I came across the
Stromberg Carlson 2026 Product Catalog
.
This catalog is packed with RV and trailer accessories that can be adapted for a cargo trailer conversion, especially for stability, access, storage, and exterior utility.
Below is a breakdown of the most relevant sections from the catalog index and how they may apply to this build.
Stromberg Carlson offers a wide range of stabilizing and leveling products that can complement the trailer’s scissor jacks and wheel chocks.
These products enhance safe entry and exit from the trailer, especially useful with the increased interior height.
Since the tongue area of this build will house major systems (HVAC condenser, propane, etc.), these accessories offer additional functionality and organization.
These accessories can enhance the garage area or provide additional exterior storage options.
If roof access becomes necessary for solar, maintenance, or storage, these products may be useful.
These items aren’t essential but could enhance the outdoor setup when the trailer is parked.
The Stromberg Carlson catalog provides a wide range of accessories that can be adapted for a cargo trailer conversion.
Many of these products are designed for RVs, but the concepts translate directly to this build — especially for stability, access, and exterior utility.
As the build progresses, I’ll reference specific products from this catalog and document how they integrate into the overall design.
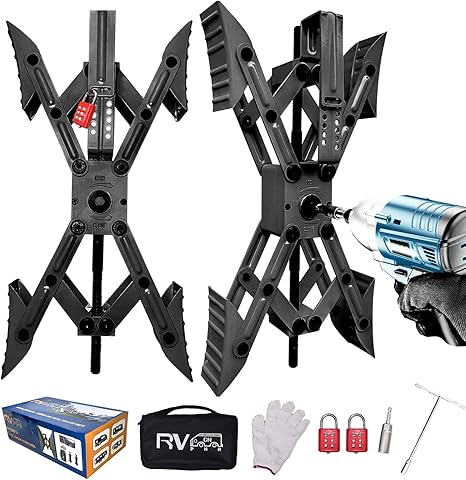
As part of the stability and leveling setup for the cargo trailer conversion, I am currently evaluating a set of
X‑shaped wheel chock stabilizers designed to reduce trailer movement when parked.
These stabilizers lock between the tires to minimize rocking, swaying, and shifting — especially useful when walking inside the trailer or during windy conditions.
The model I am considering is the
RVPNR X‑Shaped Camper Wheel Chock Stabilizer (Model RVPNR219B)
.
This set includes two stabilizers and integrated locking mechanisms, making it a practical option for both security and stability.
These stabilizers expand between the tandem tires using a scissor‑style mechanism.
Once tightened, they create outward pressure that prevents the wheels from rolling or shifting.
This significantly reduces the side‑to‑side and front‑to‑back movement that can occur when the trailer is parked.
Here is a helpful demonstration video showing how they are used:
Watch the usage video on Amazon
I will continue evaluating this stabilizer set as part of the overall leveling and stabilization system.
If selected, I’ll update this page with installation notes, performance impressions, and integration with the trailer’s leveling workflow.
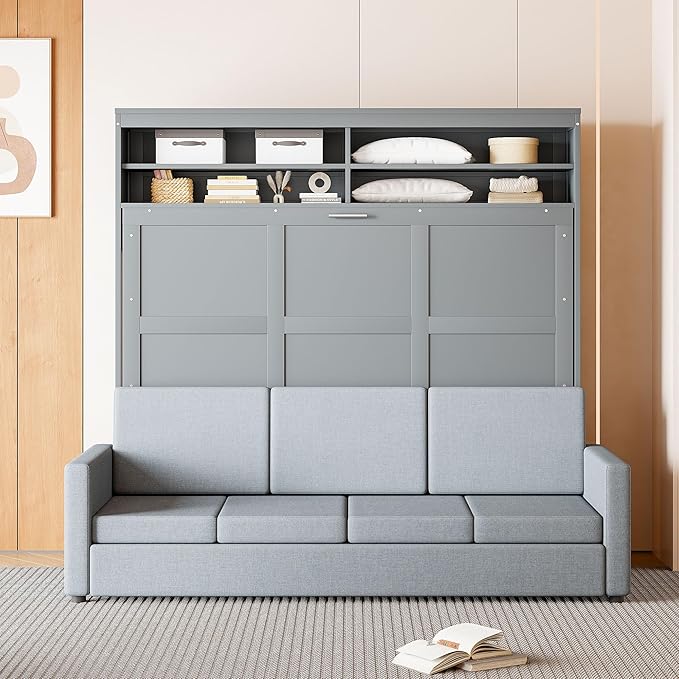
As I refine the layout for the bedroom area of the cargo trailer conversion, one of the strongest contenders for the sleeping setup is a
queen-size Murphy bed with an integrated couch and storage. This approach maximizes floor space during the day while still providing a full, comfortable sleeping area at night.
The model I am currently leaning toward is the
https://www.amazon.com/LZ-LEISURE-ZONE-Murphy-Cushion/dp/B0DS5SBM57/
It combines a fold-down queen bed, a four-seat sofa, and built-in shelving, making it a multifunctional piece that fits well with the flexible design goals of this build.
Below are the key specifications for this Murphy bed model:
Because this is a residential-style Murphy bed, there are a few installation factors to plan for:
This Murphy bed aligns with the overall design philosophy of the build:
flexibility, comfort, and efficient use of space.
It allows the bedroom to function as both a sleeping area and a daytime living space without requiring major structural modifications.
As the build progresses, I’ll update this page with installation notes, anchoring methods, weight details, and final photos once the unit is installed.
Every now and then in this build, I hit a moment where a single decision suddenly unlocks a cleaner, smarter, more intentional layout.
Today was one of those moments — and it came in the form of a steel cargo tray designed for generators.
Specifically, the Stromberg Carlson CC‑255 Trailer Tray.
This tray is now the foundation for mounting my HVAC condenser on the tongue, above the propane tanks.
And honestly, it feels like one of the most strategic upgrades I’ve made so far.
Originally, the HVAC condenser was going to live in the garage.
It made sense on paper — plenty of space, easy access, and a straight shot to the air handler.
But the more I thought about it, the more it bothered me:
I wanted the garage to be a clean mechanical bay — hot water, manifolds, electrical routing — not a heat chamber.
So I started looking at exterior mounting options.
The tongue already houses the dual propane tanks, and it’s one of the most structurally solid parts of the trailer.
It’s also exposed to open air, which is exactly what a condenser needs.
The challenge was finding a way to mount the condenser above the propane tanks without interfering with:
That’s when I found the Stromberg Carlson CC‑255.
I came across a video of someone using the CC‑255 tray to mount a generator above their propane tanks.
And immediately I thought:
“That’s it. That’s exactly how I can mount the condenser.”
The tray clamps directly to the A‑frame, sits above the tanks, and provides a stable, adjustable-height platform.
It’s built for outdoor equipment, it’s rated for the weight, and it solves every clearance issue in one move.
This tray wasn’t designed for HVAC equipment, but it might as well have been.
It solves a real problem with a clean, off‑the‑shelf solution.
Relocating the condenser to the tongue has a ripple effect across the entire build:
It’s one of those decisions that makes everything else better.
The Stromberg Carlson CC‑255 Trailer Tray wasn’t originally on my radar, but it ended up being exactly what I needed.
It’s strong, adjustable, purpose-built for the A‑frame, and it turns the tongue into a high‑function mechanical platform.
Sometimes the best solutions come from looking at a problem sideways — or in this case, from above the propane tanks.
I’m excited to get this tray installed and start mocking up the condenser placement.
This is one of those upgrades that feels like a turning point in the build.
When I first started planning this build, the toilet decision felt “done.” I picked the Nature’s Head, dropped it into the plans, and moved on.
It’s a proven, popular composting toilet with a solid track record, and it slotted neatly into the bathroom layout without much debate.
But as this project has evolved, so has my thinking. Today was one of those days where I went down a deep rabbit hole on composting toilets—especially the DIY side—and came back up seriously questioning whether a $1,000+ commercial unit still makes sense for this build.
The more I read, the more I realized how simple the core system really is. Strip away the marketing and molded housings, and a composting toilet is basically:
That’s the heart of it. Everything else is enclosure, ergonomics, and branding.
Nature’s Head does all of that in a clean, integrated package—and it does it well. But once you understand the underlying components, it’s hard not to look at that four-figure price tag and start doing the math.
One thing about this build: I’m not afraid to get hands-on. I’m already designing and installing plumbing, electrical, propane, and HVAC systems.
So when I look at a composting toilet and realize it’s mostly smart carpentry plus a few key parts, the thought naturally pops up:
“I can build something just as functional for a fraction of the cost.”
And at this point, I really believe that.
The Nature’s Head is still a great product. It’s well-engineered, well-documented, and widely used. But $1,000+ (once you factor in tax and shipping) is a big chunk of budget for something I might be able to replicate for a couple hundred dollars and a weekend of focused work.
Once you start looking, you realize there’s an entire ecosystem around DIY composting toilets:
That last one is especially interesting: I can build a custom enclosure that fits my space, my height, my storage needs, and my aesthetic—without paying for a pre-molded shell that was designed for a generic use case.
In other words, I can design the toilet to fit the trailer, not force the trailer to fit the toilet.
The more I read, the more one theme kept coming up: ventilation is what makes or breaks a composting toilet.
If you have:
…then odor control becomes very manageable. And those are all things I’m already dealing with in other parts of the build—fans, vents, penetrations, and airflow.
So from a systems perspective, a DIY composting toilet doesn’t feel like a stretch. It feels like one more small subsystem that plugs into the larger ventilation and electrical picture.
On paper, the Nature’s Head is still the “official” toilet in my plans. It’s in the diagrams, it’s in the layouts, and it’s in the documentation.
But mentally, I’m in a different place now.
I’m keeping my options open. I’m not locked into a commercial unit just because I wrote it down early in the process.
As the build progresses and I get deeper into the details, the idea of a custom composting toilet—built around my space, my needs, and my budget—is becoming more realistic and more appealing.
Today wasn’t about buying anything or installing anything. It was about stepping back and asking a simple question:
“Does this expensive, off-the-shelf solution still make sense now that I understand how it works?”
Right now, my honest answer is: maybe not.
I’m not making a final call yet, but I’m also not blindly paying $1,000+ for something I can likely build myself for a fraction of that cost.
This build has always been about intentional choices, and the toilet is officially back on the “intentional choice” list.
For now, I’m going to keep researching DIY composting designs, sketching ideas, and watching how the rest of the systems come together.
When it’s time to commit, I want that decision to feel as solid as the rest of the trailer—not just “good enough,” but truly aligned with how I’m building this thing: thoughtfully, creatively, and on purpose.
Brand: RecPro
Model: 10 Cu Ft 12V Refrigerator
Type: Frost‑Free RV Refrigerator with Freezer
Finish: Black / Stainless Steel
Product Link:
View on RecPro
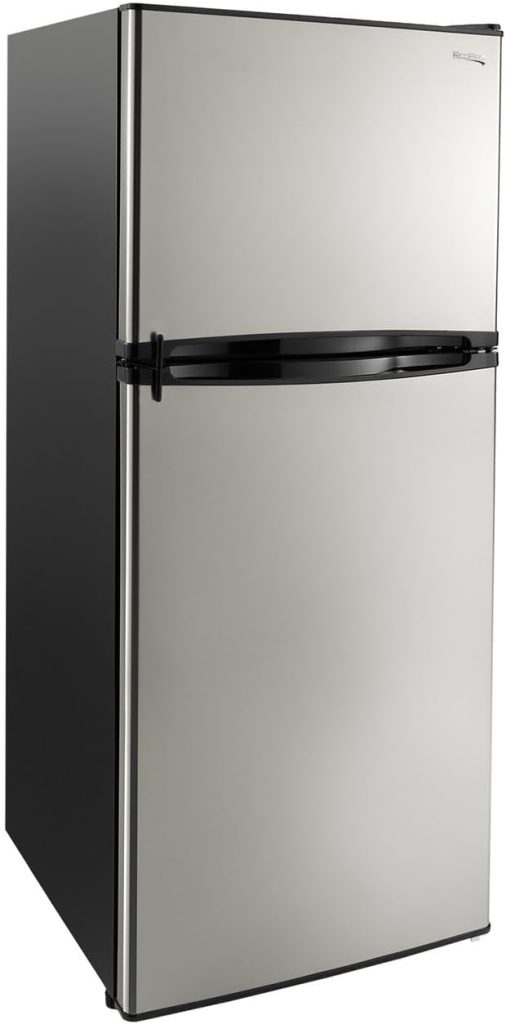
Overall Size (W × D × H): 23.5″ × 26″ × 59″
Interior Capacity: 10 cubic feet
Unit Weight: 112.4 lbs
Wanted to share this good post I found about refrigerators https://www.thervgeeks.com/12v-rv-refrigerator/

Brand: CAMPLUX
Model: RGS21MSF
Type: 3‑Burner Propane Range with Oven
Finish: Stainless Steel
Product Link:
View on Amazon
Overall Size (W × D × H): 21.3″ × 21.54″ × 16.06″
Oven Capacity: 1.8 cubic feet
Installation Type: Slide‑In Range
Unit Weight: 63 lbs
Model: DL‑6194C‑01
Brand: DreamLine
Color: White
Material: Acrylic / ABS
Kit Includes: 36″ × 36″ Single‑Threshold Shower Base + QWALL‑5 Backwall Panels
Product Link:
View on Amazon
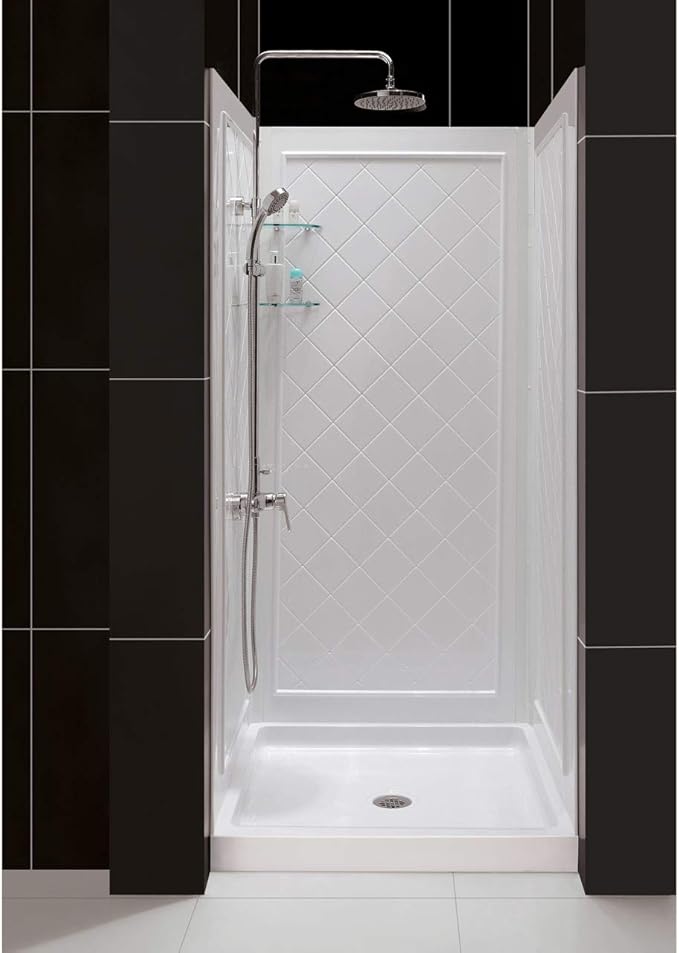
Overall Kit Size (D × W × H): 36″ × 36″ × 76.75″
Shower Base: 36″ × 36″ (Center Drain)
Backwall Panels: Trim‑to‑fit design
Total Weight: 79.4 lbs